

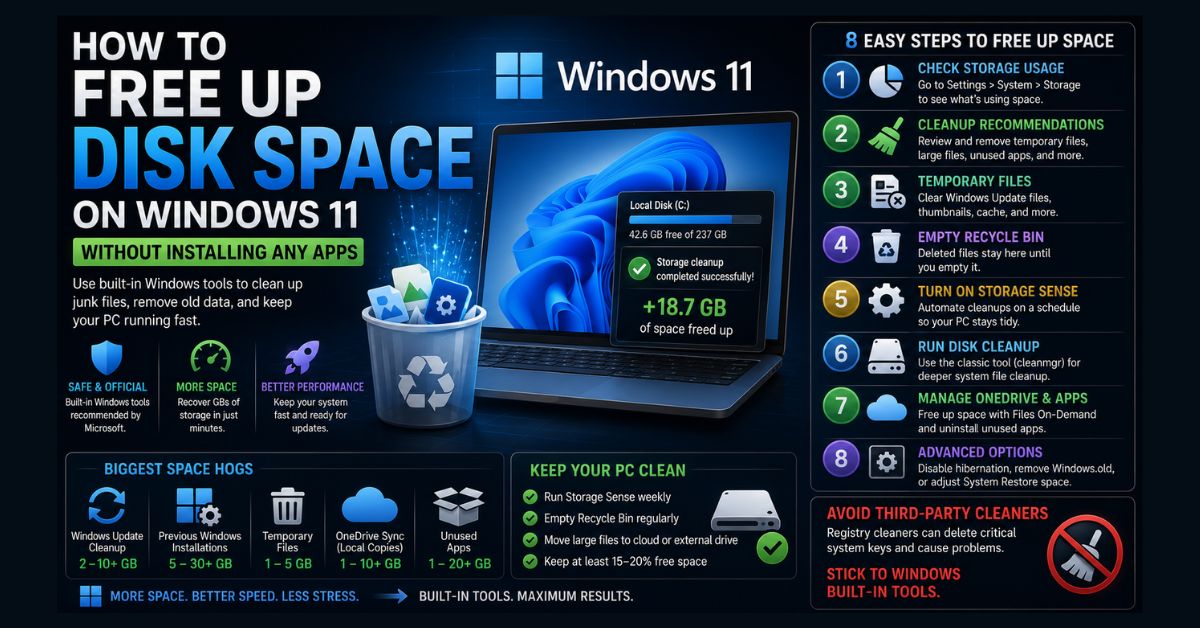
To free up disk space on Windows 11 without any apps, use the built-in tools: run Cleanup recommendations, clear Temporary files, empty the Recycle Bin, turn on Storage Sense, and run Disk Cleanup. Add OneDrive Files On-Demand and uninstall unused apps for more. Most people reclaim 10–30GB in minutes, with no third-party software.
- Fastest win: Settings › System › Storage › Cleanup recommendations
- Set and forget: turn on Storage Sense to clean up automatically
- Deeper sweep: the classic Disk Cleanup removes system files Settings can miss
- Don’t install cleaners: Microsoft advises against registry cleaners
- Rule of thumb: keep at least 15–20% of your drive free for smooth performance
If your Windows 11 PC is low on space, you do not need CCleaner or any other third-party tool. Windows has everything built in, and Microsoft actually recommends against registry cleaners because they can delete critical system keys. This guide walks through every built-in method, in order, so you can stop after you have freed enough space.
Work through the steps top to bottom and check your free space after each one. To see it at any time, open File Explorer, select This PC, and look under Devices and drives.
How do I free up disk space on Windows 11 without apps?
Use the storage tools built into Settings and Windows itself. The quickest path is Settings › System › Storage, where Cleanup recommendations, Temporary files, and Storage Sense live. For a deeper pass, the classic Disk Cleanup tool removes system files that the Settings view can leave behind. None of this requires a download.
A good target is to keep your drive below about 80 to 85 percent full. Performance and Windows updates both suffer when a system drive gets too tight.
Step 1: See what’s using your disk space
Before deleting anything, find out where your space went.
- Open Settings (Windows key + I).
- Go to System › Storage.
- Review the breakdown under Storage usage, which groups space by Installed apps, System and reserved, Temporary files, Documents, Pictures, and more.
This tells you whether your problem is temporary junk, large media files, or apps, which decides where to focus.
Step 2: Run Cleanup recommendations (fastest win)
This is the single most effective built-in tool, because Windows finds the safe-to-remove items for you.
- Go to Settings › System › Storage › Cleanup recommendations.
- Review each category: Temporary files, Large or unused files, Files synced to the cloud, and Unused apps.
- Tick the items you want to remove, then select Clean up for each section.
Windows shows how much space each selection saves. If it has been fewer than 10 days since a Windows upgrade, your previous installation may appear here as a removable system file.
Step 3: Clear temporary and Windows Update files
Temporary files pile up from updates, apps, and browsing, and they are safe to clear.
- Go to Settings › System › Storage › Temporary files.
- Review the list, which can include Windows Update Cleanup, Delivery Optimization files, thumbnails, and Recycle Bin contents.
- Select what you want to remove and choose Remove files.
Windows Update Cleanup alone can free several gigabytes. Keep in mind that Windows holds onto some update files for about 10 days so it can roll back if an update misbehaves.
Step 4: Empty the Recycle Bin
Here is the catch that trips up most people: deleting a file in File Explorer does not reclaim space. The file sits in the Recycle Bin until you empty it.
Right-click the Recycle Bin on your desktop and choose Empty Recycle Bin. If you have been deleting files and not seeing free space grow, this is almost always why. (If you empty it and realize you needed something, see our guide to recovering deleted files.)
Step 5: Turn on Storage Sense to automate cleanups
Storage Sense keeps your drive tidy on a schedule so it does not creep back to full. It is off by default.
- Go to Settings › System › Storage › Storage Sense.
- Turn it on and open its settings.
- Set Run Storage Sense to Every week (or During low free disk space).
- Choose how long files stay in the Recycle Bin before deletion.
- Optionally set the Downloads folder to clear files you have not opened in a while.
- Select Run Storage Sense now to clean immediately.
One caution: only enable automatic Downloads cleanup if you are sure nothing important lives there, since it deletes by age, not by importance.
Step 6: Run Disk Cleanup for a deeper sweep
The classic Disk Cleanup tool (cleanmgr) still exists and reaches some system files the Settings view does not. This matters because, after a recent Windows update, the Cleanup recommendations scan runs without elevated permissions and can skip admin-restricted items such as Windows Update files and drivers.
- Type Disk Cleanup in the taskbar search and open it.
- Select your drive (usually C:) and choose OK.
- Select Clean up system files for a deeper pass.
- Tick the categories you want, then choose OK to delete.
The More options tab offers extra removals. Be careful with “previous Windows installations,” because deleting them removes your ability to roll back to the prior version of Windows.
Step 7: Free up space from OneDrive and unused apps
Two quick wins live outside the Storage menu.
Make OneDrive files online-only. If you sync OneDrive, full copies may be stored locally. Turn on Files On-Demand in OneDrive settings, then right-click a file or folder in File Explorer and select Free up space to convert it to online-only. A blue cloud icon means online-only with no local space used.
Uninstall apps you don’t use. Go to Settings › Apps › Installed apps, sort by size, and remove what you no longer need. For more performance gains beyond storage, see our guide on how to make your laptop faster.
Step 8 (advanced): Reclaim more with hibernation and old Windows files
If space is still tight, these recover larger blocks but come with tradeoffs.
Disable hibernation. The hidden hiberfil.sys file can take up several gigabytes. To remove it, open Command Prompt or Terminal as administrator and run powercfg /hibernate off. Note this also disables Fast Startup and the hibernate option.
Remove the Windows.old folder. After a major update, your old installation can occupy many gigabytes. Use Cleanup recommendations or Disk Cleanup to remove it, remembering that this ends your ability to roll back.
Reduce System Restore space. In System Protection settings, you can lower the disk space reserved for restore points, which frees space while keeping the feature on.
Built-in cleanup tools at a glance
| Tool | Where to find it | What it clears | Best for |
| Cleanup recommendations | Settings › System › Storage | Temp files, large/unused files, cloud files, unused apps | Quick guided cleanup |
| Temporary files | Settings › System › Storage › Temporary files | Update leftovers, thumbnails, Recycle Bin | Targeted junk removal |
| Storage Sense | Settings › System › Storage › Storage Sense | Temp files, Recycle Bin, Downloads, cloud | Automatic ongoing upkeep |
| Disk Cleanup | Search “Disk Cleanup” | System files, Windows Update cleanup, old installs | Deeper, admin-level sweep |
| Files On-Demand | File Explorer / OneDrive settings | Local copies of synced cloud files | Reclaiming OneDrive space |
| Uninstall apps | Settings › Apps › Installed apps | App install size | Removing unused programs |
What’s safe to delete on Windows 11 (and what to leave alone)
When in doubt, stick to the items Windows surfaces in the Storage tools. Those are designed to be safe.
Safe to delete
- Temporary files and thumbnails
- Windows Update Cleanup and Delivery Optimization files
- Recycle Bin contents
- Downloads you no longer need
- The Windows.old folder, if you are sure you will not roll back
Leave alone
- Files inside the Windows or System32 folders that you do not recognize
- The page file (pagefile.sys) and anything in Program Files you cannot identify
- OneDrive files marked “Always keep on this device” that you need offline
- Anything a third-party registry cleaner flags, since these can break Windows
If space vanishes again quickly for no clear reason, malware can be the cause. A scan with the built-in Windows Security is worth running, and our guide to removing malware for free covers the steps.
How to keep your disk from filling up again
The lasting fix is automation plus habits. Leave Storage Sense on a weekly schedule, empty the Recycle Bin regularly, and move photos and videos to an external or cloud drive rather than letting them collect on C:.
Keeping headroom on your system drive also prevents two common headaches: sluggish performance, covered in our piece on fixing a slow Windows 11, and failed updates, which we troubleshoot in Windows 11 update stuck fixes.
The bottom line
Windows 11 gives you everything you need to recover disk space, no downloads required. Start with Cleanup recommendations and Temporary files for an immediate few gigabytes, turn on Storage Sense so it stays clean, and reach for Disk Cleanup when you want a deeper sweep. Skip the third-party cleaners; the built-in tools are safer, free, and just as effective.
FAQ
How much disk space can I free up on Windows 11?
Most users reclaim 10 to 30GB using the built-in tools, depending on how long it has been since the last cleanup. Windows Update Cleanup, temporary files, and a leftover Windows.old folder are usually the biggest single sources of recoverable space.
Is it safe to delete temporary files in Windows 11?
Yes. Temporary files are leftover data from apps, updates, and browsing, and Windows is designed to let you clear them safely through Settings › System › Storage › Temporary files. Windows keeps some update files for about 10 days in case it needs to roll back an update.
Will Storage Sense delete my personal files?
Not by default. Storage Sense focuses on temporary files and the Recycle Bin, and it does not touch your Downloads folder or OneDrive files unless you specifically enable those options. Files marked “Always keep on this device” are always exempt.
Should I delete the Windows.old folder?
You can, and it often frees many gigabytes, but only if you are confident you will not want to roll back to your previous version of Windows. Once it is removed, that rollback option is gone. It typically appears for about 10 days after a major update.
Do I need a third-party cleaner like CCleaner for Windows 11?
No. Windows 11’s built-in tools handle the same cleanup safely and for free. Microsoft advises against registry cleaners in particular, because they can delete important system keys and cause problems, and many third-party cleaners add startup load and ads.