

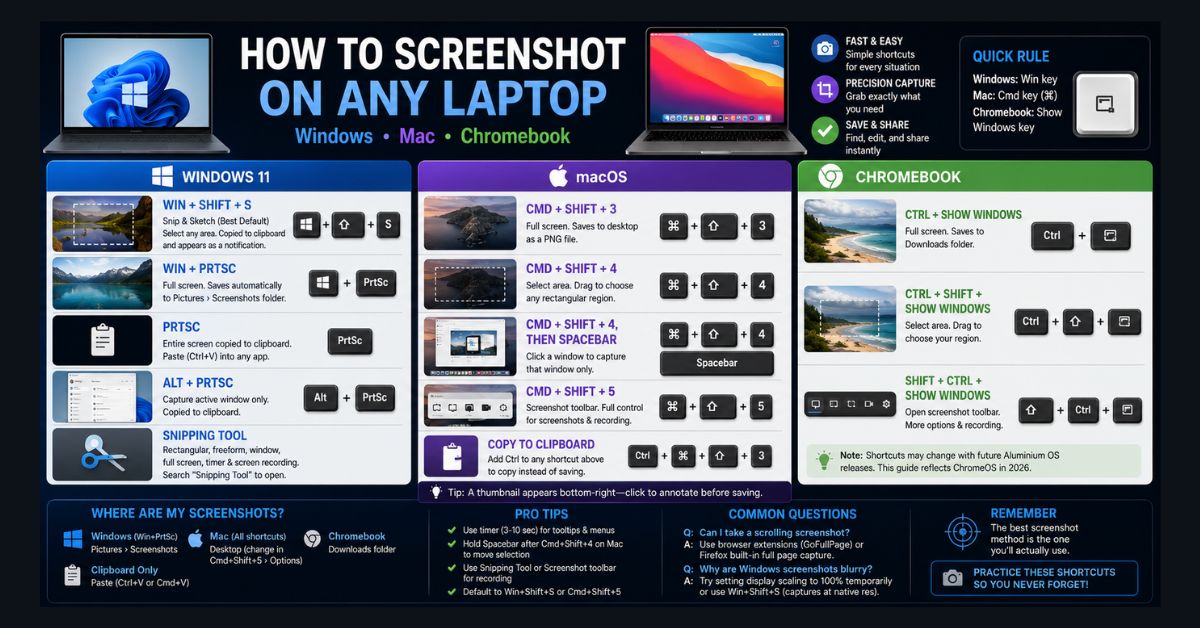
A laptop screenshot uses a different keyboard shortcut on each operating system. On Windows 11, press Win+Shift+S to capture a selected area or Win+PrtSc to save the full screen. On a Mac, press Cmd+Shift+3 or Cmd+Shift+4. On a Chromebook, press Ctrl+Show Windows for the full screen.
- Windows default: Win+Shift+S opens Snipping Tool, and on Windows 11 the PrtSc key opens the same overlay by default
- Windows auto-save: Win+PrtSc and Snipping Tool captures are saved to Pictures → Screenshots
- Mac control: Cmd+Shift+5 opens a toolbar with capture, recording, timer, and save-location options
- Chromebook: Screenshots save to the Downloads folder by default, and Shift+Ctrl+Show Windows opens the full capture toolbar
- Full-page capture: Microsoft Edge (Ctrl+Shift+S) and Firefox include full-page screenshots, while Chrome needs an extension
Taking screenshots should be simple — and it is, once you know the shortcuts. The problem is that every operating system does it differently, the keyboard shortcuts aren’t always obvious, and some of the most useful methods are hidden behind key combinations that nobody stumbles upon accidentally.
This guide covers every screenshot method for every laptop type: Windows, Mac, and Chromebook. We’ll start with the method you should default to for each platform, then cover every alternative for specific situations.
Laptop Screenshot Shortcuts at a Glance
| Laptop | Whole screen | Part of the screen | Where it saves |
|---|---|---|---|
| Windows 11 (HP, Dell, Lenovo, ASUS, Acer, Surface) | Win+PrtSc | Win+Shift+S (or PrtSc) | Pictures → Screenshots |
| Mac (MacBook Air, MacBook Pro) | Cmd+Shift+3 | Cmd+Shift+4 | Desktop |
| Chromebook | Ctrl+Show Windows | Ctrl+Shift+Show Windows | Downloads |
If your laptop has no Print Screen key, or the shortcut does nothing, jump to laptops without a Print Screen key or screenshot shortcut not working.
Windows Laptop Screenshots
Best Default Method: Win+Shift+S (Snipping Tool)
Press Win+Shift+S and your screen dims with a selection toolbar at the top. Drag to select any rectangular area, and the screenshot copies to your clipboard and appears as a notification in the bottom-right corner. Click the notification to open it in the Snipping Tool, where you can annotate with a pen, highlighter, or text before saving. On Windows 11, Snipping Tool also saves each capture automatically to your Screenshots folder (Pictures → Screenshots), according to Microsoft’s Snipping Tool guide, so you no longer need to save it by hand.
This is the method to memorize. It’s faster than any alternative, captures exactly the area you want (no cropping afterward), and the notification gives you immediate access to annotation tools.
Full Screen: Win+PrtSc
Press Win+PrtSc (Print Screen). The screen flashes briefly, and the screenshot saves automatically as a PNG file in your Pictures → Screenshots folder. No cropping, no pasting — just a file ready to attach or share.
On some laptops (particularly compact models), you need Win+Fn+PrtSc because the Print Screen function is shared with another key.
Clipboard Only: PrtSc
On current Windows 11 builds, pressing PrtSc alone opens the same Snipping Tool selection overlay as Win+Shift+S by default, according to Microsoft’s Windows keyboard shortcut reference. Microsoft notes that this behavior is controlled by a setting, so you can turn off the option that makes the Print Screen key open screen snipping if you prefer the classic behavior.
With that option turned off, and on Windows 10, PrtSc copies the entire screen to your clipboard and saves nothing to a file. You then paste it (Ctrl+V) into Paint, Word, an email, a chat, or any app that accepts images. This is the oldest screenshot method in Windows and remains useful when you want to paste directly into a specific document.
Single Window Only: Alt+PrtSc
Click the window you want to capture, then press Alt+PrtSc. Only that specific window is captured — no taskbar, no desktop background, no other windows. The result copies to your clipboard for pasting.
This is perfect for documenting a specific app’s state — a settings dialog, an error message, or a particular browser tab — without background clutter.
Snipping Tool (Maximum Control)
Search “Snipping Tool” in the Start menu for full-featured capture. Choose from rectangular, freeform (draw any shape), single window, or full screen capture. Set a delay timer (3, 5, or 10 seconds) to capture tooltips, dropdown menus, and other elements that disappear when you click away.
Snipping Tool also supports screen recording — click the video camera icon, or press Win+Shift+R to select a region and start recording directly, as listed in Microsoft’s shortcut reference. For more advanced recording, see our best free screen recorders guide.
If your laptop feels sluggish while processing screenshots, the issue is system performance rather than the screenshot tool — our speed guide covers quick fixes.
Games and Full-Screen Apps: Win+Alt+PrtSc
Press Win+Alt+PrtSc to take a screenshot of the active game or app with Xbox Game Bar. It saves as a file in Videos → Captures, which makes it the easiest option on gaming laptops when a full-screen game hides the Snipping Tool overlay.
How to Screenshot on HP, Dell, Lenovo, ASUS, Acer and Surface Laptops
Every Windows laptop uses the same Windows shortcuts, whatever the brand. What changes from one model to the next is the keyboard. Look for a key labeled PrtSc, PrtScn, Prt Sc or Print Screen, usually in the top row near Delete or End. On many laptops it shares a key with another function, so you hold Fn while pressing it.
- HP, Dell, Lenovo, ASUS, Acer and MSI laptops: press Win+Shift+S to capture part of the screen, or Win+PrtSc for the whole screen. If PrtSc does nothing, try Fn+PrtSc or Win+Fn+PrtSc.
- If the top row controls brightness or volume instead: your laptop’s Fn Lock is set to media keys. Hold Fn with the key, or toggle Fn Lock (often Fn+Esc, but check your model’s manual).
- Microsoft Surface laptops: the same keyboard shortcuts apply. On a Surface tablet or a 2-in-1 folded into tablet mode, press Power+Volume Up together.
- Gaming laptops: Win+Alt+PrtSc saves a screenshot of the game you are playing, as described above.
How to Screenshot on a Laptop Without a Print Screen Key
You do not need a Print Screen key on Windows 11. These options work on any laptop:
- Win+Shift+S: opens the Snipping Tool capture bar without touching Print Screen, then saves the capture to Pictures → Screenshots.
- Snipping Tool from the Start menu: search for Snipping Tool, click New, and pick rectangle, window, freeform or full screen.
- On-Screen Keyboard: press Win+Ctrl+O to open Windows’ On-Screen Keyboard, which has its own PrtScn key you can click.
- Remap a spare key: Microsoft’s free PowerToys app includes a Keyboard Manager that can turn a key you rarely use into Print Screen.
On a Mac, screenshots never use a Print Screen key: the Cmd+Shift shortcuts below work on every MacBook.
Mac Laptop Screenshots
Full Screen: Cmd+Shift+3
Press Cmd+Shift+3. A thumbnail appears in the bottom-right corner (click it to annotate), and the screenshot saves to your desktop as a PNG file. A camera shutter sound confirms the capture.
Selected Area: Cmd+Shift+4
Press Cmd+Shift+4. A crosshair cursor appears — drag to select any rectangular area. Release the mouse to capture. The screenshot saves to your desktop.
Pro tip: After pressing Cmd+Shift+4, hold Spacebar to lock the selection dimensions and reposition it. This is useful when you need a precise area but didn’t start your drag in exactly the right spot.
Single Window: Cmd+Shift+4, then Spacebar
Press Cmd+Shift+4, then press Spacebar (don’t drag). Your cursor changes to a camera icon. Click any window to capture just that window with a clean transparent shadow — no other windows, no desktop background. This produces the cleanest window captures of any operating system.
Screenshot Toolbar: Cmd+Shift+5 (Most Control)
Press Cmd+Shift+5 for a floating toolbar with all options: full screen, selected window, selected area, record entire screen, or record selected area. The toolbar also includes an Options menu where you can change the save location (default: Desktop), set a timer, and choose whether to show the mouse cursor.
Changing the default save location: Press Cmd+Shift+5, click Options, and select a different folder (Downloads, Documents, or any custom folder). This keeps your desktop clean.
Touch Bar (If Equipped): Cmd+Shift+6
For MacBook Pro models with a Touch Bar, Cmd+Shift+6 captures the Touch Bar display as a separate image. Niche, but useful for documentation.
Copy to Clipboard Instead of Saving
Add Ctrl to any Mac screenshot shortcut to copy to clipboard instead of saving a file. For example: Cmd+Ctrl+Shift+3 captures the full screen to clipboard. Cmd+Ctrl+Shift+4 captures a selected area to clipboard. Then paste with Cmd+V.
Chromebook Screenshots
Full Screen: Ctrl+Show Windows
Press Ctrl+Show Windows (the key that looks like a rectangle with two lines next to it — usually where F5 would be). The screenshot saves to the Downloads folder and a notification appears in the bottom-right corner.
Selected Area: Ctrl+Shift+Show Windows
Press Ctrl+Shift+Show Windows. A selection overlay appears — drag to select the area you want. The screenshot saves to Downloads.
Screenshot Toolbar: Shift+Ctrl+Show Windows
Press Shift+Ctrl+Show Windows to open the full screenshot toolbar. This provides options for full screen, partial capture, and window capture, plus screen recording with or without microphone audio. According to Google’s Chromebook Help, keyboards without a Show windows key use Ctrl+Shift+F5 instead, and Chromebooks with a dedicated Screenshot key can press that key to open the same tools. Screenshots and recordings save to the Downloads folder by default, and you can change the location in the screen capture settings.
Note: With Google’s Aluminium OS now ships as Googlebook OS on new Googlebook laptops (on sale in the U.S. since October 4, 2026), so check that device’s help pages for its screenshot keys. Existing Chromebooks still run ChromeOS, and the shortcuts above apply to them.
Where Are My Screenshots?
Finding your screenshots after taking them depends on your method and operating system:
Windows Win+PrtSc: Pictures → Screenshots folder (auto-saved PNG files). Windows Alt+PrtSc (and PrtSc with the Snipping Tool option turned off): Clipboard only — paste into any app. Windows Win+Shift+S (and PrtSc by default on Windows 11): Clipboard, plus an automatic copy in Pictures → Screenshots saved by Snipping Tool. Mac all shortcuts: Desktop by default (change via Cmd+Shift+5 → Options). Chromebook: Downloads folder by default (changeable in screen capture settings).
Why Is My Laptop Screenshot Shortcut Not Working?
When a shortcut seems to do nothing, the capture has usually happened somewhere you did not expect, or another app or a keyboard setting got in the way. Work through these checks in order:
- Check the clipboard and the Screenshots folder. Win+Shift+S copies the capture even if you miss the notification. Paste with Ctrl+V into a chat or document, or open Pictures → Screenshots.
- Try Fn with the key. On many laptops PrtSc is a secondary function, so press Fn+PrtSc or Win+Fn+PrtSc.
- Check the Print Screen setting. In Windows 11, go to Settings → Accessibility → Keyboard and look at the option that makes the Print Screen key open screen capture. With it off, PrtSc only copies to the clipboard.
- Look for another app that claims the key. OneDrive, Dropbox and screenshot tools such as Lightshot, Greenshot or ShareX can take over Print Screen. Turn off their screenshot option or change their hotkey.
- Turn on Snipping Tool notifications. If captures work but you never see the preview, enable notifications for Snipping Tool in Settings → System → Notifications.
- Repair Snipping Tool. Go to Settings → Apps → Installed apps, open Snipping Tool’s advanced options, and choose Repair, then Reset if that does not help. Restart the laptop afterward.
On a Mac, open System Settings → Keyboard → Keyboard Shortcuts → Screenshots and make sure the shortcuts are turned on. On a school or work Chromebook, your administrator may have disabled screenshots, which you cannot change yourself.
FAQ
1. How do I take a scrolling screenshot (capture an entire long webpage)?
No operating system has built-in scrolling screenshot support. Here are the best options: in Microsoft Edge, press Ctrl+Shift+S and choose “Capture full page”, which is built into the browser according to Microsoft’s Edge guide. In Chrome, install the “GoFullPage” extension — one click captures the entire scrollable page. In Firefox, right-click anywhere on the page → “Take Screenshot” → “Save full page” — this is built into Firefox, no extension needed. For desktop apps (not just browsers), use ShareX on Windows (free) or Shottr on Mac (free).
2. How do I screenshot a dropdown menu or tooltip that disappears when I click?
Use a timed screenshot. On Windows, open Snipping Tool and set a 3-5 second delay — this gives you time to open the menu or trigger the tooltip before the capture happens. On Mac, press Cmd+Shift+5, click Options, and set a 5 or 10 second timer.
3. Can I record my screen instead of taking a screenshot?
Yes, on all platforms. Windows: press Win+G to open Xbox Game Bar with built-in recording, or use Snipping Tool’s video mode (Win+Shift+R). Mac: press Cmd+Shift+5 and select the recording option. Chromebook: use the screenshot toolbar (Shift+Ctrl+Show Windows) and select the video icon. For more advanced recording options, see our best free screen recorders guide.
4. How do I take a screenshot on a tablet or convertible laptop?
On Windows tablets (Surface, etc.): press Power+Volume Up simultaneously. On iPad: press Power+Home (or Power+Volume Up on iPads without a Home button). On Android tablets: press Power+Volume Down simultaneously.
5. Why are my Windows screenshots blurry?
This usually happens when your display scaling is set above 100% (common on high-resolution laptops). The screenshot captures at the scaled resolution. To get pixel-perfect screenshots: right-click your desktop → Display settings → Scale → set to 100% temporarily, take your screenshot, then change scaling back. Alternatively, Win+Shift+S captures at native resolution regardless of scaling.
6. How do I screenshot on an HP, Dell or Lenovo laptop?
Use the standard Windows shortcuts: press Win+Shift+S to capture part of the screen or Win+PrtSc to save the whole screen to Pictures → Screenshots. If the Print Screen key does nothing, it may be a secondary function on your keyboard, so press Fn+PrtSc or Win+Fn+PrtSc instead.
7. How do I take a screenshot if my laptop has no Print Screen key?
On Windows 11, press Win+Shift+S, which does not need a Print Screen key, or open Snipping Tool from the Start menu. You can also press Win+Ctrl+O to open the On-Screen Keyboard and click its PrtScn key. On a Mac, use Cmd+Shift+3 or Cmd+Shift+4.